
How to Walk With a Cane: Fit, Technique, and Stairs
A cane only helps if it is the right height, held in the right hand, and moved in the right rhythm. This guide walks you — or the person you care for — through each of those, step by step, including the stair rule every cane user should know.
Founder & Senior Care Researcher
Based on physical-therapy and mobility-safety guidance; not a substitute for advice from your doctor or physical therapist.
Key takeaways
- Set the cane so the handle lines up with the crease of the wrist when standing tall with arms relaxed — the elbow should bend about 15–20 degrees.
- Hold the cane in the hand opposite the weaker leg. It feels backwards at first, but it is how the body naturally balances.
- Move the cane and the weak leg together, then step past with the strong leg. Cane and weak leg are a team.
- On stairs: up with the good leg first, down with the bad leg first — and use the handrail whenever one exists.
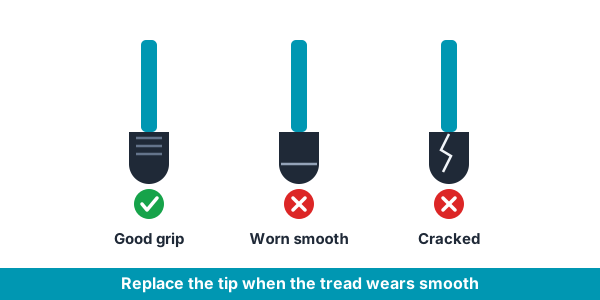
- Check the rubber tip monthly and replace it when worn: a worn tip on a smooth floor is one of the most preventable causes of cane slips.
Quick answer
How do you walk with a cane correctly?
Hold the cane in the hand opposite your weaker leg, set so the handle meets your wrist crease when your arm hangs relaxed. Move the cane forward together with the weak leg, press down on it as that leg bears weight, then step through with the strong leg. Keep steps small and even, look ahead rather than down, and on stairs lead up with the strong leg and down with the weak leg, holding the rail.
Step 1: Get the cane height right
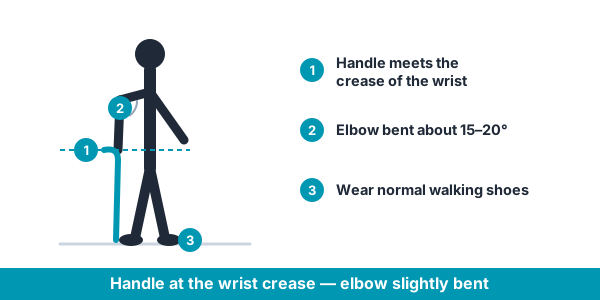
Everything else in this guide depends on this step. A cane that is too tall pushes the shoulder up and forces the elbow out; a cane that is too short makes the user lean sideways and stoop. Both are worse than no cane at all, because they pull the body out of its natural upright balance.
Here is the fitting method physical therapists use. Have the person stand tall in their normal walking shoes, arms hanging relaxed at their sides. The top of the cane handle should reach the crease on the inside of the wrist. When they then grip the handle, the elbow should bend slightly — about 15 to 20 degrees. That soft bend is what lets the arm absorb weight without locking or hunching.
Most adjustable aluminum canes move in 1-inch increments through roughly the 28–38 inch range, which covers the large majority of adults. Wooden canes must be cut to length, so fit them extra carefully before trimming.
Fit it in their shoes
Always fit the cane while wearing the shoes the person actually walks in. Fitting barefoot or in slippers can put the height off by an inch — enough to matter.
Step 2: Which side do you use a cane on?
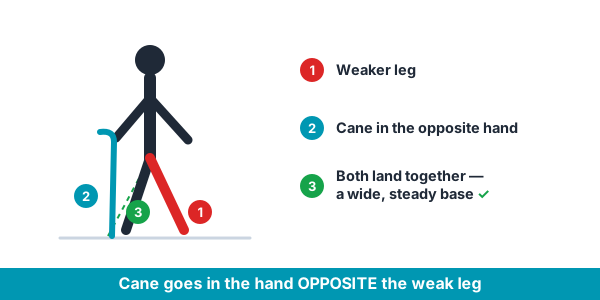
This is the single most common mistake, and it is completely understandable: instinct says to hold the cane on the weak side, right next to the leg that needs help. The correct answer is the opposite. Hold the cane in the hand on the strong side — opposite the weaker leg.
Why? Two reasons. First, when the cane is opposite the weak leg, the cane and the weak leg touch the ground at the same time, spreading the load across a wide, stable triangle of support. Second, it preserves the body’s natural walking rhythm: humans naturally swing the opposite arm forward with each step, so cane-opposite-leg matches the pattern the body already knows.
If both legs are equally affected, or the cane is for general balance rather than one weak side, most people hold it in their dominant hand — but this is exactly the situation where a physical therapist’s advice is most valuable.
Safety first
If a doctor or physical therapist has told the person to use a specific side — after a stroke or joint replacement, for example — follow that instruction over any general rule.
Step 3: The walking pattern
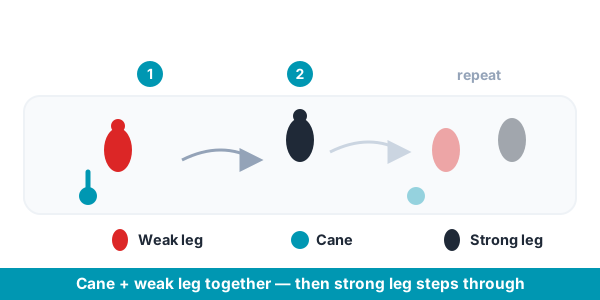
With the height set and the correct hand chosen, the pattern itself is simple to remember: the cane and the weak leg move together. Think of them as a team — they advance together, they bear weight together.
- 1
Stand tall and balanced
Start with weight even on both feet, cane at your side, eyes ahead. Take a breath — rushing is the enemy of balance.
- 2
Move the cane and weak leg forward together
Advance the cane a comfortable step-length ahead — about the distance of a normal step, not a lunge — and bring the weak leg forward level with it.
- 3
Press down as the weak leg takes weight
Let the arm push down through the cane while the weak leg bears weight. The cane is now carrying part of the load that leg would otherwise take alone.
- 4
Step through with the strong leg
Bring the strong leg forward past the cane and weak foot — a natural walking step, not a shuffle up to them. Stepping through keeps the gait smooth and even.
- 5
Repeat in rhythm
Cane and weak leg, then strong leg. Small, even, unhurried steps. With a little practice the rhythm becomes automatic.
A phrase that helps
Many caregivers teach it as a little chant: "cane and weak — then strong." Saying it out loud during the first practice sessions genuinely helps the pattern stick.
Turning around safely
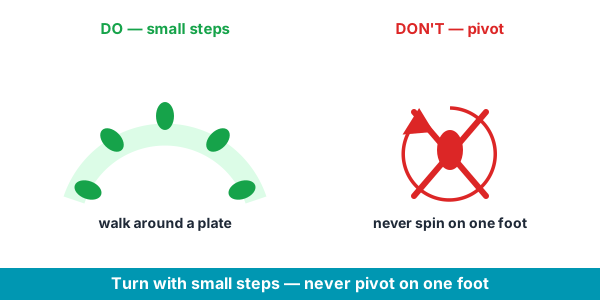
More falls happen during turns than during straight walking, because turning narrows the base of support and asks the body to rotate at the same time. The rule: never pivot on one foot.
- Turn with small steps in a half-circle, keeping both feet moving — think of walking around a large dinner plate rather than spinning on a point.
- Turn toward the stronger side when possible; it keeps the weak leg on the inside of the turn where it travels less distance.
- Keep the cane moving with you through the turn, planting it firmly with each small step.
- Slow down. A turn should take three or four small steps, not one quick swivel.
Stairs: up with the good, down with the bad
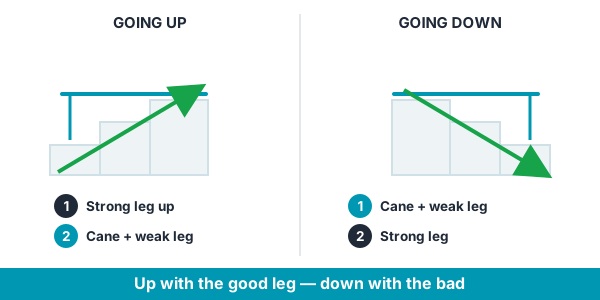
Stairs deserve their own rule, and it is one of the oldest and best in rehabilitation: "Up with the good, down with the bad." The strong leg leads going up; the weak leg leads going down. Either way, the strong leg does the hard work of lifting or lowering the body.
- 1
Going up: strong leg first
Hold the rail with one hand and the cane in the other (or tuck the cane under the cane-arm and use both hands on the rail if allowed). Step up with the strong leg, then bring the cane and the weak leg up onto the same step. One step at a time.
- 2
Going down: cane and weak leg first
Place the cane down on the lower step, step down with the weak leg, then lower the strong leg to join it. The strong leg stays above, controlling the descent.
- 3
No rail? Treat it as a flag
A stretch of stairs with no handrail is a genuine hazard for a cane user. Where it is at home, installing a rail is one of the highest-value safety upgrades a family can make.
Safety first
If stairs feel frightening even with the rule, stop and talk to a physical therapist before practicing further. Fear on stairs is a signal worth respecting, not pushing through alone.
Sitting down and standing up with a cane
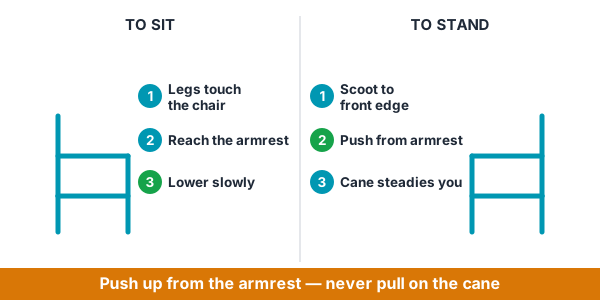
Chairs are where many near-falls happen, because people turn, reach, and lower themselves all at once. Break it into stages instead.
- To sit: walk close, then turn with small steps until the backs of both legs touch the chair. Reach back for the armrest with the free hand, keep the cane planted for balance with the other, and lower slowly — do not drop the last few inches.
- To stand: scoot to the front edge of the seat first. Feet under the knees, cane planted slightly ahead on the strong side. Push up from the armrest with one hand while the cane steadies — push from the chair, not by pulling on the cane.
- Pause for a breath after standing before taking the first step. Blood pressure needs a moment to catch up, especially for older adults.
Watch out
Never pull up on the cane like a lever to rise from a chair — canes are not built for that force and can slip or tip. Push down through the chair’s armrest instead.
The six most common cane mistakes
If walking with the cane feels awkward or unhelpful, one of these is almost always the reason:
- Wrong hand. Holding the cane on the weak side instead of opposite it — the number-one error.
- Wrong height. A handle at fingertip height (too short) or mid-forearm (too tall) instead of the wrist crease.
- Placing the cane too far ahead. Over-reaching turns the cane into a pole vault; keep it within a natural step’s distance.
- Looking down at the feet. It curls the posture and actually worsens balance — eyes ahead, chin level.
- Leaning heavily sideways onto the cane. A cane assists; it does not carry. If the person truly hangs on it, they may need a walker instead.
- Ignoring a worn rubber tip. A smooth, cracked, or hardened tip loses grip exactly when it is needed most.
Posture and balance habits that make the cane work
The cane is one third of the system; posture and strength are the other two. A tall, level posture keeps the body’s weight over its base, where balance is easiest.
- Stand tall: head level, shoulders relaxed and even — the cane hand should not hike the shoulder up.
- Eyes ahead on where you are going, not down at the cane tip.
- Small, even steps beat long, ambitious ones — rhythm is stability.
- Wear firm, low-heeled, non-slip shoes; a good cane cannot rescue slippery soles. See our guide to shoes that help prevent falls.
Balance is also trainable at any age. Gentle, regular practice — heel-to-toe standing, supported single-leg stands, sit-to-stand repetitions — measurably improves steadiness. Our balance exercises for seniors guide walks through a safe routine to pair with cane use.
Which type of cane is right?
Technique matters more than equipment, but the right cane type makes technique easier. Here is how the main options compare:
| Type | Best for | Keep in mind |
|---|---|---|
| Single-point cane | Light balance support and general steadiness | The lightest and most natural gait; offers the least support |
| Quad cane (four feet) | More support after a stroke or with real weakness | Stands on its own; slightly heavier and needs flat ground to sit level |
| Folding cane | Travel, car trips, and part-time use | Check the locking joints regularly for wear |
| Seat cane | Long outings where rest breaks help | Heavier; the seat is for brief rests, not full support |
Good to know
We compare specific models — handles, weight ratings, and bases — in our full review of the best canes for seniors.
Cane care and everyday safety
A few small habits keep the cane trustworthy:
- Check the rubber tip monthly. Replace it when the tread looks smooth, cracked, or hardened — tips cost little and matter enormously on tile and wet floors.
- Test the adjustment button and locking collar now and then; a cane that telescopes unexpectedly is dangerous.
- Mind wet and polished floors. Slow right down on tile, in bathrooms, and on rainy-day entryways; consider a tip designed for extra grip if these are daily terrain.
- Light the walking routes at home. Night lights along the bed-to-bathroom path prevent the falls that happen at 2 a.m.
- Keep the cane within reach at the bedside and favorite chair, so there is never a temptation to take "just a few steps" without it.
When a cane is no longer enough
A cane suits someone who needs a little help with balance or one weaker leg. It is the wrong tool when the need grows beyond that, and recognizing the transition early prevents falls. Consider stepping up to more support if any of these appear:
- Leaning heavily on the cane, or gripping furniture and walls even while using it
- Two or more stumbles or falls in recent months, or new dizziness when standing
- Fatigue after short distances that used to be easy
- Both legs now feel weak, rather than one
The next steps up are a walker for maximum stability, or a rollator — a wheeled walker with a seat — for someone who can control wheels and values a built-in rest. A physical therapist can assess which is right in a single visit, and it is one of the most worthwhile appointments a family can arrange. For the bigger picture on repeated falls, see our guide on what to do when an elderly parent keeps falling.
Frequently asked questions
Which side do you use a cane on?
On the side opposite your weaker or painful leg. If your right hip or knee is the problem, the cane goes in your left hand, on your left side. It feels backwards to most people, but it is what widens your base of support and lets the cane take weight at the moment the weak leg needs it. If you are using a cane purely for balance rather than for one bad leg, hold it in whichever hand you use less.
What is the proper use of a walking cane?
Three things have to be right. Set the height so the handle meets your wrist crease when your arm hangs relaxed, giving a slight bend at the elbow. Hold the cane on the side opposite the weaker leg. Then move the cane forward at the same time as the weak leg, press down on it as that leg takes weight, and step through with the strong leg. On stairs, lead up with the good leg and down with the bad.
Which hand should hold the cane?
The hand opposite the weaker leg. If the left leg is weak, hold the cane in the right hand. This widens the base of support when the weak leg bears weight and matches the body’s natural opposite-arm swing. If neither leg is clearly weaker, most people use their dominant hand — and a physical therapist can confirm the best choice.
How do I know if a cane is the right height?
Stand tall in normal walking shoes with arms relaxed. The handle should line up with the crease of the wrist, and the elbow should bend about 15–20 degrees when gripping it. If the shoulder hikes up, the cane is too tall; if the user leans sideways to reach it, it is too short.
Does the cane move with the weak leg or the strong leg?
With the weak leg. Cane and weak leg advance together and bear weight together; then the strong leg steps through past them. A simple way to remember it: "cane and weak — then strong."
How do you go up and down stairs with a cane?
Up with the good, down with the bad. Going up, step up with the strong leg first, then bring the cane and weak leg up to the same step. Going down, place the cane and step down with the weak leg first, then lower the strong leg to join them. Always use the handrail when there is one.
Why does using a cane feel awkward at first?
Because it changes a walking rhythm the body has used for decades, and because instinct says to put the cane on the weak side (the wrong side). Awkwardness for the first few days is normal. Practicing indoors on a clear, flat route for a few minutes at a time — ideally with someone alongside — usually makes the pattern automatic within a week or two.
How much weight can you put on a cane?
A cane is designed to assist balance and take a modest share of load — not to carry the body. If someone is leaning hard on the cane, hanging on it to rise from chairs, or still grabbing furniture while using it, that is the signal to be assessed for a walker or rollator, which are built for real weight-bearing.
When should a senior switch from a cane to a walker?
When one-sided, light support is no longer enough: heavy leaning, repeated stumbles or falls, weakness in both legs, or exhaustion over short distances. A walker offers a stable frame on four points; a rollator adds wheels and a seat for those who can control it. A physical-therapy assessment is the reliable way to time the switch.
How often should the rubber tip be replaced?
Inspect it monthly and replace it as soon as the tread looks smooth, cracked, or hardened — for a daily-use cane that is often every few months. The tip is the cane’s only contact with the floor, and a worn one is a leading, entirely preventable cause of cane slips.
